Recently I’ve been exploring creating acceptance tests for my WordPress plugins. I decided that Codeception was the best tool for the job, and WP Browser was a good bootstrap for running WordPress-specific tests. That makes it fairly simple to run WebDriver tests locally using PhantomJS or even a real browser. I also wanted to run my acceptance tests on Travis CI though, and that proved to be a real challenge. After a lot of trial and error I finally got it to work. But rather than trying to tell you all about it, it is much easier just to show you. So I’ve created a demo GitHub repo just for that purpose. Head on over there to check it out and see it in action!
If you unit test your WordPress projects with PHPUnit, sooner or later you’ll want to test some code that interacts with the filesystem. If you are interacting with the filesystem properly, you’ll be using the $wp_filesystem object.
A few months ago I found myself needing to test some code that created a file using the WordPress filesystem API. I searched for a good solution, and found the information about mocking the filesystem on the PHPUnit website. But after tinkering with vfsStream, I decided it would be easier to build a simple filesystem mocker myself than to integrate vfsStream with the WP Filesystem API. So I did.
[It] Provides a class that can be used as a mock filesystem, and also a shim for the WordPress filesystem API that uses it. This is useful in unit tests that include simple filesystem operations.
PHPUnit offers a feature that lets you skip a test when certain requirements aren’t met. This can be done in two ways:
You can manually check if the requirements are met, and then skip the test with $this->markTestSkipped() if they are not.
In some cases, you can use the @requires annotation, and the test will be skipped automatically when the requirements aren’t met.
Using the @requires annotation is nicer, but PHPUnit only has so many options built in. Sometimes you have custom requirements that can’t really be checked reliably with any of the built-in options. An example is when you need some tests you’ve written for a WordPress plugin to run only when WordPress’s multisite feature is enabled on the test site. In my tests, I find myself needing this a lot. So I’ve been writing this over and over:
if ( ! is_multisite() ) {
     $this->markTestSkipped( 'Multisite must be enabled.' );
}
But just yesterday I realized that this was silly, and that I could easily add my own custom @requires annotation. So I did. Here is the code:
	protected function checkRequirements() {

		parent::checkRequirements();

		$annotations = $this->getAnnotations();

		foreach ( array( 'class', 'method' ) as $depth ) {

			if ( empty( $annotations[ $depth ]['requires'] ) ) {
				continue;
			}

			$requires = array_flip( $annotations[ $depth ]['requires'] );

			if ( isset( $requires['WordPress multisite'] ) && ! is_multisite() ) {
				$this->markTestSkipped( 'Multisite must be enabled.' );
			} elseif ( isset( $requires['WordPress !multisite'] ) && is_multisite() ) {
				$this->markTestSkipped( 'Multisite must not be enabled.' );
			}
		}
	}
You just need to add that method to your base test case class, and you will then be able to use @requires WordPress multisite instead of messing with markTestSkipped() all the time. For tests that should only run when multisite isn’t enabled, you can use @requires WordPress !multisite.
You could easily add more options for any other requirements your tests commonly have.
Writing unit tests for your WordPress plugins might sound like a daunting task, but trust me, once you take the plunge and learn how, it won’t be so hard after all. Actually, it will make your life a whole lot easier.
I am just starting my own journey into unit testing as I write this. I’d never heard of the WordPress unit tests, or PHPUnit. But I stumbled through the process of setting things up as a newbie to the command line. I hope this tutorial will make your initiation into plugin unit testing smoother than mine.
Install it first!
Before we go further, you’ll need to download the WordPress developer tools, and install PHPUnit. I originally did this through WP-CLI (which you’ll need to install if you want to use it).
To install the WordPress developer suite manually, you can run the following from the command line:
# Make the directory for the tools (assumes that ~/svn exists;
# you can create it by running "$ mkdir ~/svn")
$ mkdir ~/svn/wordpress-dev

# Change to the new directory we just made.
$ cd ~/svn/wordpress-dev

# Check out the developer tools with SVN.
$ svn co http://develop.svn.wordpress.org/trunk/
Next you will need to follow the instructions in the /trunk/tests/phpunit/README.txt file to set up the tests configuration. Once that is done, if you want to run the tests for WordPress itself, just run the phpunit command from the /trunk directory:
# Change to the trunk directory.
$ cd ~/svn/wordpress-dev/trunk/

# Make sure the checkout is up to date.
$ svn up

# Run all of the tests.
$ phpunit

# Run only, e.g., the cache tests.
$ phpunit tests/phpunit/tests/cache
Setting Up Your Plugin for Testing
Now that you’ve installed all of the necessary components, you will need to set up your plugin so it can be tested in the same way. If you’ve installed WP-CLI, you can do that automatically from the command line. Whether you do that or not, it’s always a good idea to understand how this works.
The first thing that you will need to do is decide where you want your plugin’s tests to reside. You could put them in a /tests/ subdirectory within your plugin, or you could set it up like the WordPress developer tools, with your plugin in a /src directory, and your tests in a /tests directory. But you don’t have to limit yourself to either of these. You can have your tests anywhere you want, and you can always change things around later (but if you do you’ll have to make a few changes to the configuration). For now, we’ll assume that your plugin’s checkout is in ~/svn/myplugin, and your tests are in ~/tests/myplugin. Then you’ll run the tests like this:
# Change to the directory with our plugin's tests.
$ cd ~/tests/myplugin

# Run the tests.
$ phpunit
To make this work, we’ll need to create a phpunit.xml file in the directory. When you run the phpunit command from that directory, it will look for that file, and read the configuration from it. You can start with the following configuration:
This configuration will load the /bootstrap.php file that we will create in a moment. It will also load all the .php files in the directory that begin with test-. Those will be your testcases.
Now we’ll need to create our bootstrap.php file. This file needs to manually load your plugin when the tests are run. The plugin needs to be loaded manually because it won’t be active on the WordPress install (no plugins will — remember this is a test environment). We can do this by hooking into the muplugins_loaded filter. The only problem is that we can’t use the add_filter() function like we normally would, because we need to hook up the function before the WordPress test environment is loaded (we’ll do that in a moment by includeing the bootstrap file from the WordPress tests). Once we load the WordPress test environment, it will initiate the tests, and then it will be too late to hook into any actions or filters after that. This is why the testing tools provided with WordPress include the function tests_add_filter(), which we can access after loading /trunk/tests/phpunit/includes/functions.php. We can use it exactly like we would use add_filter(), but before WordPress has been loaded.
So our bootstrap file will look something like this:
<?php

/**
 * Set up environment for my plugin's tests suite.
 */

/**
 * The path to the WordPress tests checkout.
 */
define( 'WP_TESTS_DIR', '/Users/me/svn/wordpress-dev/trunk/tests/phpunit/' );

/**
 * The path to the main file of the plugin to test.
 */
define( 'TEST_PLUGIN_FILE', '/Users/me/svn/myplguin/myplugin.php' );

/**
 * The WordPress tests functions.
 *
 * We are loading this so that we can add our tests filter
 * to load the plugin, using tests_add_filter().
 */
require_once WP_TESTS_DIR . 'includes/functions.php';

/**
 * Manually load the plugin main file.
 *
 * The plugin won't be activated within the test WP environment,
 * that's why we need to load it manually.
 *
 * You will also need to perform any installation necessary after
 * loading your plugin, since it won't be installed.
 */
function _manually_load_plugin() {

	require TEST_PLUGIN_FILE;

	// Make sure plugin is installed here ...
}
tests_add_filter( 'muplugins_loaded', '_manually_load_plugin' );

/**
 * Sets up the WordPress test environment.
 *
 * We've got our action set up, so we can load this now,
 * and viola, the tests begin.
 */
require WP_TESTS_DIR . 'includes/bootstrap.php';
Just paste that into your bootstrap.php file and make sure WP_TEST_DIR and TEST_PLUGIN_FILE are defined properly, and your plugin is ready for testing!
(Note: If you use WP-CLI to generate the scaffolding for you plugin tests, the setup will differ slightly from that described here.)
Writing Your Tests
You are now ready to begin writing your tests. Remember to prefix the files with the tests in them with test- if you are using the XML PHPUnit configuration shown above.
A basic test will look something like this:
<?php

/**
 * An example test case.
 */
class MyPlugin_Test_Example extends WP_UnitTestCase {

	/**
	 * An example test.
	 *
	 * We just want to make sure that false is still false.
	 */
	function test_false_is_false() {

		$this->assertFalse( false );
	}
}
Now for some tips!
Use WP_UnitTestCase
When you are writing your tests, don’t extend the PHPUnit_Framework_TestCase class as shown in the PHPUnit docs. Instead, use WordPress’s own extension of this class included in the testing suite, called WP_UnitTestCase. It is defined in includes/testcase.php, and offers extra functionality to help you write your tests more easily.
Object Factories
One of the advantages of using WP_UnitTestCase is its factories. These can be accessed through the factory member variable. The factory is an object with properties that are each an instance of one of the classes defined in includes/factory.php. What do they do, you ask? They make it very simple to create users, posts, terms, etc., wherever you need them in your test. So, instead of doing this:
$args = array(
	/* A bunch of user data you had to make up */
);

wp_insert_user( $args );
You can just do this:
$user_id = $this->factory->user->create();
But wait, it gets even better. What if you need many users (or posts, or whatever)? You can just create them in bulk like this:
That will create 25 users that you can use in your test.
The factory has the following properties that you can use:
$post
$attachment
$comment
$user
$term
$category
$tag
$blog
They may all be used in the same manner as demonstrated in the above example with the $user factory. For example, you can create a post like this:
$this->factory->post->create();
You can also specify particular arguments to use for creating the object. In the above example we created a post, but it wasn’t assigned to a particular user (the post_author field will default to 0). Sometimes we may want the post assigned to a user instead. We’d do that like this:
// $post will be an instance of WP_Post
$post = $this->factory->post->create_and_get();
In this example, we used the post factory, but the same is true for all of the factories.
Set Up and Tear Down
One of the great things about using the WP_UnitTestCase class as a parent for your test cases, is that it will clean up everything before your test is run, so that it won’t be thrown off by leftovers from other tests. It does this using the setUp() and tearDown() methods which are automatically called by PHPUnit before and after each test method is run, respectively. This is great, and will save you hours of debugging if you remember one important thing: Whenever you need to implement these methods in your child class, be sure to call parent::setUp() and parent::tearDown() at the top of each function, respectively. If you don’t, the sky may fall on your head.
This automated cleanup means that you generally don’t need to worry about cleaning things up, either before or after your tests. Just test away, and WP_UnitTestCase will clean up after you. For example, if you add an option in the test, you don’t need to delete it afterward. In the tearDown(), WP_UnitTestCase performs a ROLLBACK query, and in setUp(), the caches are flushed.
Conclusion
If you haven’t written any unit tests for your plugin yet, now is the time to start! It makes it very easy to test whether your plugin is functioning properly as you develop it, and isn’t too difficult to set up and maintain. If you run into trouble or find any tips along the way, be sure to leave a comment below. Happy testing!
The WordPress Settings API can be used by plugins and themes to easily create settings pages. The API lets you create settings fields and assign them to a form. The API handles the form submission. This is a really great developer helper, and it was added in WordPress 2.7.
I was working on a plugin recently that needed to have a settings page. So, I took a look at the Settings API in the WordPress Codex. Then I looked at the various tutorials on it. In short, I couldn’t find anything that really explained it in simple terms. It took me a while to figure out exactly what groups and sections and fields were. The problem was that there were no illustrations, or detailed explanations of exactly what was going on. The example code wasn’t always that great either, and was hard to follow.
This my be a unique experience, and maybe others catch onto the API much quicker. But for those like me who are looking for a little bit better documentation, here it is. A complete working sample is at the bottom of the page. Enjoy!
Creating an Options Page
If you are using the Settings API, you are might be thinking of creating a new settings page. Actually, that isn’t necessary, and if your settings fit in somewhere on one of the preexisting options pages, you might want to consider just putting them here instead. But in many cases, that really doesn’t make sense. So here is how to create your own settings or options page.
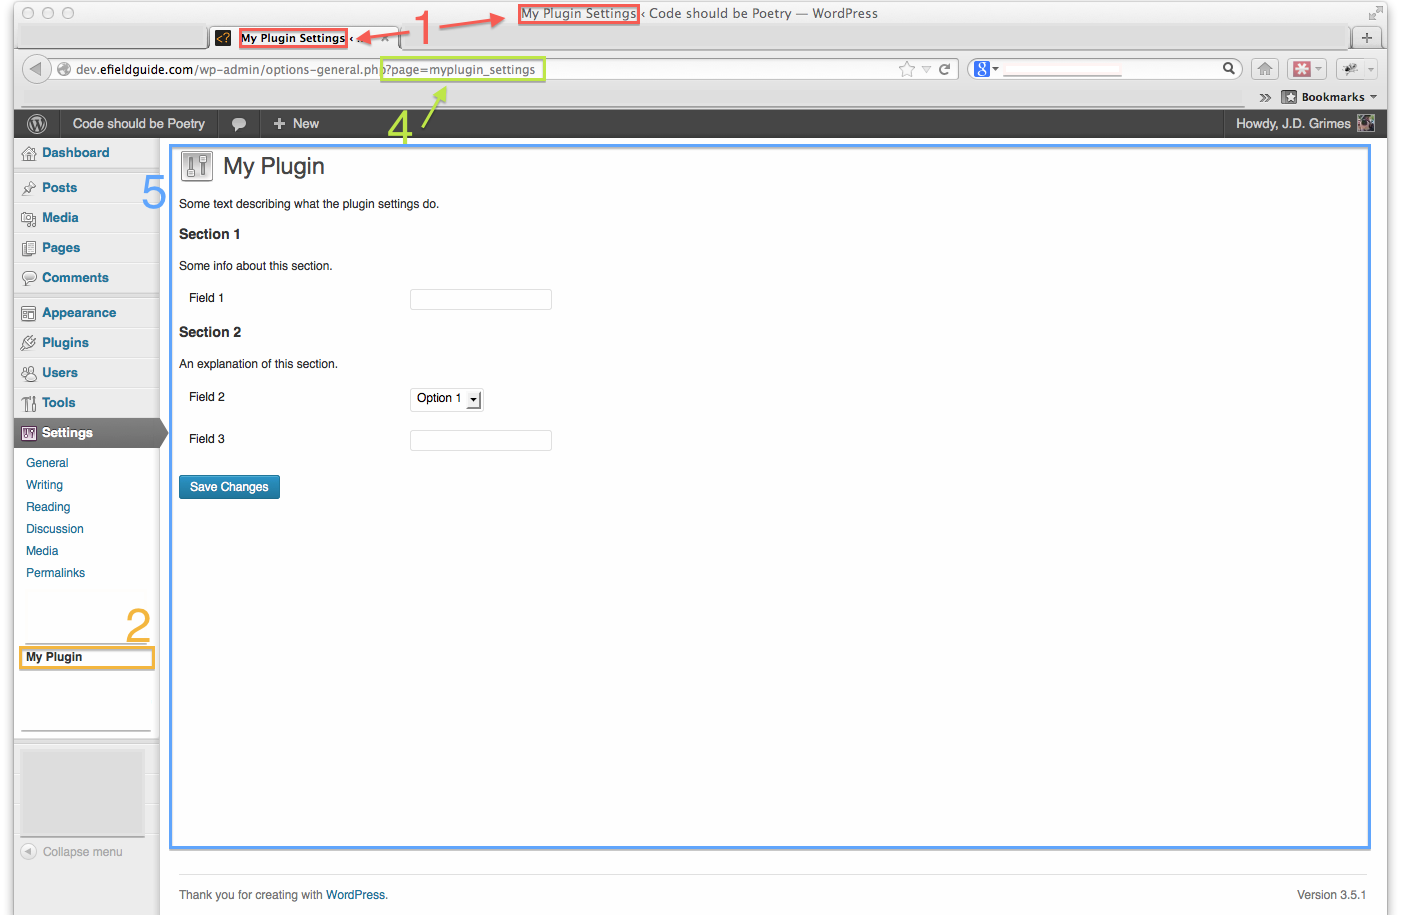
For this, you can use the add_options_page() function. (If you don’t want your options page under the settings menu, then you will want to use the add_menu_page() or add_submenu_page() functions instead.) The function takes 5 parameters, which are illustrated below.
The page title (shown in the browser title bar, etc.).
The menu title (shown in the menu).
The minimum capability required to access the page (you will probably want to use 'manage_options').
The page slug.
The name of the function that will output the page’s contents.
As you can see, we need to hook this function to the 'admin_menu' action.
The function that displays the page’s contents (outlined in blue above), might look something like this:
<?php

/** Settings Page Content **/
function myplugin_settings_page() {

	?>

	<div class="wrap">
		<?php

		// Uncomment if this screen isn't added with add_options_page()
		// settings_errors();

		?>

		<h2>My Plugin</h2>
		<p>Some text describing what the plugin settings do.</p>

		<form method="post" action="options.php">
			<?php

			// Output the settings sections.
			do_settings_sections( 'myplugin_settings' );

			// Output the hidden fields, nonce, etc.
			settings_fields( 'myplugin_settings_group' );

			// Submit button.
			submit_button();

			?>
		</form>
	</div>

	<?php
}

?>
This function creates a form, inside of which we call several functions. As you can see, the form will POST its data to the options.php page. This is important, because unless you set the action to point to options.php, your data wont automatically be saved. Don’t worry though, this doesn’t mean that you have to use the API only on admin screens registered as sub-menus of the options page; after the data is saved the user will be redirected back to wherever they started. And if you are using the Settings API on an admin screen that isn’t a child of the options admin screen, you’ll want to add a call to settings_errors() to the top of your screen, to display any errors (and, unintuitively, the success message when all goes well).
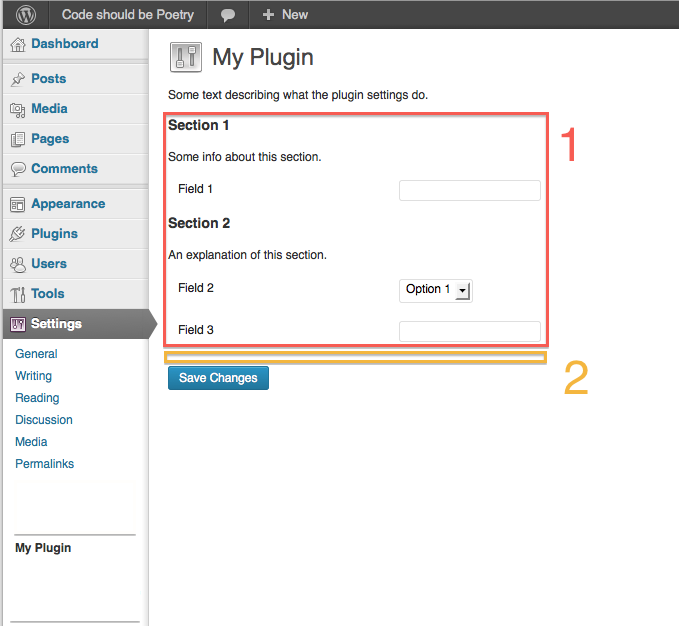
Within the form, we first call do_settings_sections(), which displays the settings sections which I’ll show you the code for in a moment (see image below). Then we call settings_fields(), which adds some hidden fields (called an options group) to go along with our sections (we’ll talk about this more a little later, too). Then we add a submit button, with the aptly named submit_button() function.
Option Groups
An option group is just a group of options. When you create a new settings field (see below), you have to add it to an options group. That field will be ignored, unless it is submitted as part of that group. The option group is defined by some hidden fields in the form, which look something like this:
The hidden fields for a particular group are added to a form using the settings_fields() function. The parameter for this function is the group’s name.
settings_fields( 'myplugin_settings_group' );
When an option is updated, WordPress checks to make sure that it was submitted along with the group it is registered with.
Creating Sections
A section, as you can see in the images, is a group of input fields under a heading and some text.
If you are creating your own settings page, then you will need to add sections to it. (If you are just adding some options to a preexisting page, then you may just want to add your fields (see below) to a section that already exists on that page.)
The setting sections registered with a page are displayed by calling the do_settings_sections() function. All of the setting sections registered with that page will be displayed.
do_settings_sections( 'myplugin_settings' );
The add_settings_section() function is the one used to add a settings section to a page. It takes four parameters:
The sections slug.
The section’s title.
The name of the function that will display the section’s content.
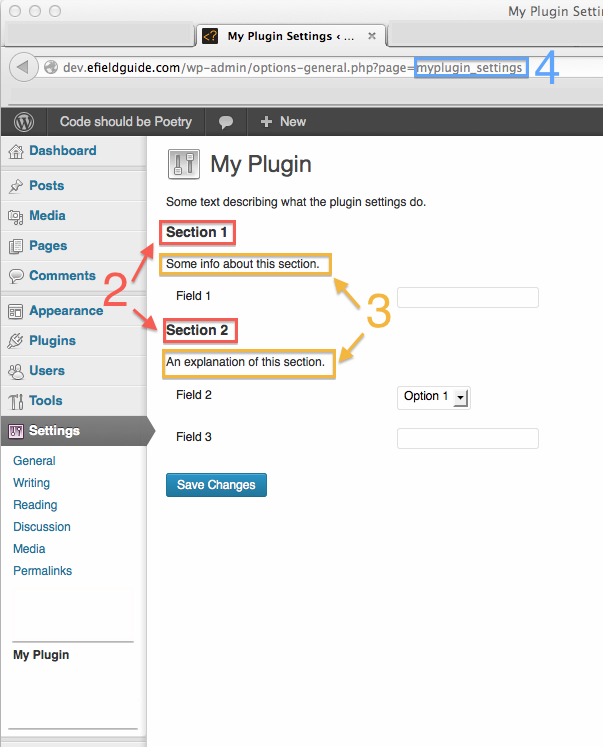
The result of that on the page is illustrated below (the second section was added in the same way).
The callback function (parameter 3) is fired right below the section heading. You can use that to add an explanation of what the section’s settings do, etc.
function myplugin_settings_section_1_callback() {

	echo( 'Some info about this section.' );
}
Adding Fields
A settings field is just a form field. It gets assigned to a particular section on a particular page, and registered with a particular group. The add_settings_field() function is the one that adds a settings field to a particular section and page. It takes five parameters:
The field’s slug.
The text of the field’s form label.
The name of the function to use to generate the form field.
We also need to create an option in the database to hold the default value of this settings field. It will automatically be updated by WordPress when the setting is updated. That’s the great thing about the Settings API!) You can do that with add_option():
add_option( 'myplugin_field_1', 'the default value for this field' );
As you can see, the first parameter is the field’s slug, the second is the value you want it to have.
We also need our function to display the field (parameter 3 of add_settings_field()). It would look like this:
In this case we are creating a text input. The name and id attributes need to match the setting field’s slug. We assign the current value of that option to the value attribute, so we know what the current setting is.
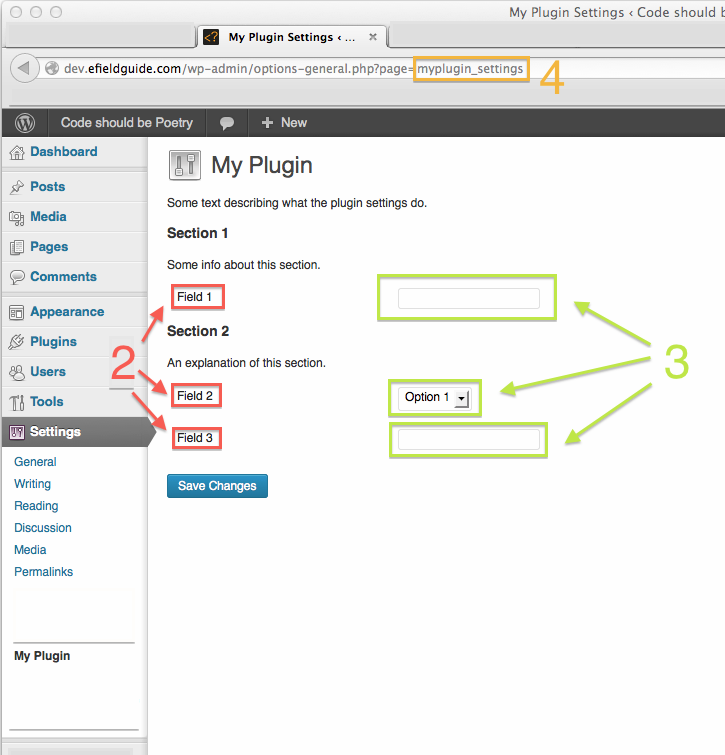
If we added two more fields, our page might look something like this:
But we still need to register our new field with a settings group, or else WordPress won’t recognize it when the settings are updated. The function to do that is register_setting():