Author Archives: J.D. Grimes

Writing WordPress Plugin Unit Tests

Writing unit tests for your WordPress plugins might sound like a daunting task, but trust me, once you take the plunge and learn how, it won’t be so hard after all. Actually, it will make your life a whole lot easier.

I am just starting my own journey into unit testing as I write this. I’d never heard of the WordPress unit tests, or PHPUnit. But I stumbled through the process of setting things up as a newbie to the command line. I hope this tutorial will make your initiation into plugin unit testing smoother than mine.

Install it first!

Before we go further, you’ll need to download the WordPress developer tools, and install PHPUnit. I originally did this through WP-CLI (which you’ll need to install if you want to use it).

To install the WordPress developer suite manually, you can run the following from the command line:

# Make the directory for the tools (assumes that ~/svn exists; 
# you can create it by running "$ mkdir ~/svn")
$ mkdir ~/svn/wordpress-dev

# Change to the new directory we just made.
$ cd ~/svn/wordpress-dev

# Check out the developer tools with SVN.
$ svn co http://develop.svn.wordpress.org/trunk/

Next you will need to follow the instructions in the /trunk/tests/phpunit/README.txt file to set up the tests configuration. Once that is done, if you want to run the tests for WordPress itself, just run the phpunit command from the /trunk directory:

# Change to the trunk directory.
$ cd ~/svn/wordpress-dev/trunk/

# Make sure the checkout is up to date.
$ svn up

# Run all of the tests.
$ phpunit

# Run only, e.g., the cache tests.
$ phpunit tests/phpunit/tests/cache

Setting Up Your Plugin for Testing

Now that you’ve installed all of the necessary components, you will need to set up your plugin so it can be tested in the same way. If you’ve installed WP-CLI, you can do that automatically from the command line. Whether you do that or not, it’s always a good idea to understand how this works.

The first thing that you will need to do is decide where you want your plugin’s tests to reside. You could put them in a /tests/ subdirectory within your plugin, or you could set it up like the WordPress developer tools, with your plugin in a /src directory, and your tests in a /tests directory. But you don’t have to limit yourself to either of these. You can have your tests anywhere you want, and you can always change things around later (but if you do you’ll have to make a few changes to the configuration). For now, we’ll assume that your plugin’s checkout is in ~/svn/myplugin, and your tests are in ~/tests/myplugin. Then you’ll run the tests like this:

# Change to the directory with our plugin's tests.
$ cd ~/tests/myplugin

# Run the tests.
$ phpunit

To make this work, we’ll need to create a phpunit.xml file in the directory. When you run the phpunit command from that directory, it will look for that file, and read the configuration from it. You can start with the following configuration:

<phpunit
	bootstrap="bootstrap.php"
	backupGlobals="false"
	colors="true"
	convertErrorsToExceptions="true"
	convertNoticesToExceptions="true"
	convertWarningsToExceptions="true"
	>
	<testsuites>
		<testsuite>
			<directory prefix="test-" suffix=".php">./</directory>
		</testsuite>
	</testsuites>
</phpunit>

This configuration will load the /bootstrap.php file that we will create in a moment. It will also load all the .php files in the directory that begin with test-. Those will be your testcases.

Now we’ll need to create our bootstrap.php file. This file needs to manually load your plugin when the tests are run. The plugin needs to be loaded manually because it won’t be active on the WordPress install (no plugins will — remember this is a test environment). We can do this by hooking into the muplugins_loaded filter. The only problem is that we can’t use the add_filter() function like we normally would, because we need to hook up the function before the WordPress test environment is loaded (we’ll do that in a moment by includeing the bootstrap file from the WordPress tests). Once we load the WordPress test environment, it will initiate the tests, and then it will be too late to hook into any actions or filters after that. This is why the testing tools provided with WordPress include the function tests_add_filter(), which we can access after loading /trunk/tests/phpunit/includes/functions.php. We can use it exactly like we would use add_filter(), but before WordPress has been loaded.

So our bootstrap file will look something like this:

<?php

/**
 * Set up environment for my plugin's tests suite.
 */

/**
 * The path to the WordPress tests checkout.
 */
define( 'WP_TESTS_DIR', '/Users/me/svn/wordpress-dev/trunk/tests/phpunit/' );

/**
 * The path to the main file of the plugin to test.
 */
define( 'TEST_PLUGIN_FILE', '/Users/me/svn/myplguin/myplugin.php' );

/**
 * The WordPress tests functions.
 *
 * We are loading this so that we can add our tests filter
 * to load the plugin, using tests_add_filter().
 */
require_once WP_TESTS_DIR . 'includes/functions.php';

/**
 * Manually load the plugin main file.
 *
 * The plugin won't be activated within the test WP environment,
 * that's why we need to load it manually.
 *
 * You will also need to perform any installation necessary after
 * loading your plugin, since it won't be installed.
 */
function _manually_load_plugin() {

	require TEST_PLUGIN_FILE;

	// Make sure plugin is installed here ...
}
tests_add_filter( 'muplugins_loaded', '_manually_load_plugin' );

/**
 * Sets up the WordPress test environment.
 *
 * We've got our action set up, so we can load this now,
 * and viola, the tests begin.
 */
require WP_TESTS_DIR . 'includes/bootstrap.php';

Just paste that into your bootstrap.php file and make sure WP_TEST_DIR and TEST_PLUGIN_FILE are defined properly, and your plugin is ready for testing!

(Note: If you use WP-CLI to generate the scaffolding for you plugin tests, the setup will differ slightly from that described here.)

Writing Your Tests

You are now ready to begin writing your tests. Remember to prefix the files with the tests in them with test- if you are using the XML PHPUnit configuration shown above.

A basic test will look something like this:

<?php

/**
 * An example test case.
 */
class MyPlugin_Test_Example extends WP_UnitTestCase {

	/**
	 * An example test.
	 *
	 * We just want to make sure that false is still false.
	 */
	function test_false_is_false() {

		$this->assertFalse( false );
	}
}

Now for some tips!

Use WP_UnitTestCase

When you are writing your tests, don’t extend the PHPUnit_Framework_TestCase class as shown in the PHPUnit docs. Instead, use WordPress’s own extension of this class included in the testing suite, called WP_UnitTestCase. It is defined in includes/testcase.php, and offers extra functionality to help you write your tests more easily.

Object Factories

One of the advantages of using WP_UnitTestCase is its factories. These can be accessed through the factory member variable. The factory is an object with properties that are each an instance of one of the classes defined in includes/factory.php. What do they do, you ask? They make it very simple to create users, posts, terms, etc., wherever you need them in your test. So, instead of doing this:

$args = array(
	/* A bunch of user data you had to make up */
);

wp_insert_user( $args );

You can just do this:

$user_id = $this->factory->user->create();

But wait, it gets even better. What if you need many users (or posts, or whatever)? You can just create them in bulk like this:

$user_ids = $this->factory->user->create_many( 25 );

That will create 25 users that you can use in your test.

The factory has the following properties that you can use:

  • $post
  • $attachment
  • $comment
  • $user
  • $term
  • $category
  • $tag
  • $blog

They may all be used in the same manner as demonstrated in the above example with the $user factory. For example, you can create a post like this:

$this->factory->post->create();

You can also specify particular arguments to use for creating the object. In the above example we created a post, but it wasn’t assigned to a particular user (the post_author field will default to 0). Sometimes we may want the post assigned to a user instead. We’d do that like this:

$user_id = $this->factory->user->create();

$post_id = $this->factory->post->create( array( 'post_author' => $user_id ) );

Also, if you need more than just the ID of the object you are creating, you don’t need to do this:

$post_id = $this->factory->post->create();

$post = get_post( $post_id );

Instead, use the create_and_get() method:

// $post will be an instance of WP_Post
$post = $this->factory->post->create_and_get();

In this example, we used the post factory, but the same is true for all of the factories.

Set Up and Tear Down

One of the great things about using the WP_UnitTestCase class as a parent for your test cases, is that it will clean up everything before your test is run, so that it won’t be thrown off by leftovers from other tests. It does this using the setUp() and tearDown() methods which are automatically called by PHPUnit before and after each test method is run, respectively. This is great, and will save you hours of debugging if you remember one important thing: Whenever you need to implement these methods in your child class, be sure to call parent::setUp() and parent::tearDown() at the top of each function, respectively. If you don’t, the sky may fall on your head.

This automated cleanup means that you generally don’t need to worry about cleaning things up, either before or after your tests. Just test away, and WP_UnitTestCase will clean up after you. For example, if you add an option in the test, you don’t need to delete it afterward. In the tearDown(), WP_UnitTestCase performs a ROLLBACK query, and in setUp(), the caches are flushed.

Conclusion

If you haven’t written any unit tests for your plugin yet, now is the time to start! It makes it very easy to test whether your plugin is functioning properly as you develop it, and isn’t too difficult to set up and maintain. If you run into trouble or find any tips along the way, be sure to leave a comment below. Happy testing!

Debugging PHP: Inspecting Variables

When debugging in PHP, we often want to know exactly what a variable is. We often know what it should be, but when things don’t work as expected, we need to know whether that’s really what it is. There are several ways to inspect variables in PHP. Among them are the following functions, listed with their downsides:

  • var_dump() – This one does great with all sorts of data types, but only outputs the result; not very useful in some situations, especially when you’re (yikes!) debugging live.
  • print_r() – This one is OK for some data types, but gives no output when passed false. On the upside, it can return the string instead of outputting it directly.
  • var_export() – This produces a parsable string, which can be useful at times, but can also be difficult to comprehend.

Of these, var_dump() is often the best for debugging, because it tells you what data type the variable is. The problem is that it only outputs the result directly, which can be annoying as I pointed out above. I prefer to use the error log when I’m debugging. So that’s why I use the function below. It works exactly like var_dump() the only difference is that it logs the result to the error log instead of outputting it.

/**
 * Dump a variable to the error log.
 *
 * You can pass as many variables as you want!
 */
function var_log() {

	ob_start();
	call_user_func_array( 'var_dump', func_get_args() );
	error_log( ob_get_clean() );
}

Think carefully before adding this to your development environment. You may find it hard to live without!

Using the WordPress Settings API

The WordPress Settings API can be used by plugins and themes to easily create settings pages. The API lets you create settings fields and assign them to a form. The API handles the form submission. This is a really great developer helper, and it was added in WordPress 2.7.

I was working on a plugin recently that needed to have a settings page. So, I took a look at the Settings API in the WordPress Codex. Then I looked at the various tutorials on it. In short, I couldn’t find anything that really explained it in simple terms. It took me a while to figure out exactly what groups and sections and fields were. The problem was that there were no illustrations, or detailed explanations of exactly what was going on. The example code wasn’t always that great either, and was hard to follow.

This my be a unique experience, and maybe others catch onto the API much quicker. But for those like me who are looking for a little bit better documentation, here it is. A complete working sample is at the bottom of the page. Enjoy!

Creating an Options Page

If you are using the Settings API, you are might be thinking of creating a new settings page. Actually, that isn’t necessary, and if your settings fit in somewhere on one of the preexisting options pages, you might want to consider just putting them here instead. But in many cases, that really doesn’t make sense. So here is how to create your own settings or options page.

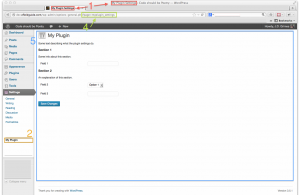
For this, you can use the add_options_page() function. (If you don’t want your options page under the settings menu, then you will want to use the add_menu_page() or add_submenu_page() functions instead.) The function takes 5 parameters, which are illustrated below.

  1. The page title (shown in the browser title bar, etc.).
  2. The menu title (shown in the menu).
  3. The minimum capability required to access the page (you will probably want to use 'manage_options').
  4. The page slug.
  5. The name of the function that will output the page’s contents.

The code might look something like this:

/** Add Settings Page **/
function myplugin_settings_menu() {

	add_options_page(
	/*1*/	'My Plugin Settings',
	/*2*/	'My Plugin',
	/*3*/	'manage_options',
	/*4*/	'myplugin_settings',
	/*5*/	'myplugin_settings_page'
	);

}
add_action( 'admin_menu', 'myplugin_settings_menu' );

As you can see, we need to hook this function to the 'admin_menu' action.

settings-api-1

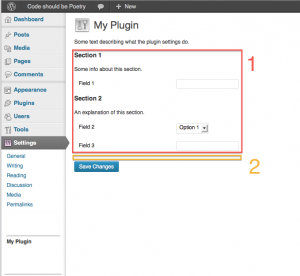
The function that displays the page’s contents (outlined in blue above), might look something like this:

<?php

/** Settings Page Content **/
function myplugin_settings_page() {

	?>

	<div class="wrap">
		<?php 
		
		// Uncomment if this screen isn't added with add_options_page() 
		// settings_errors(); 
		
		?>

		<h2>My Plugin</h2>
		<p>Some text describing what the plugin settings do.</p>

		<form method="post" action="options.php">
			<?php

			// Output the settings sections.
			do_settings_sections( 'myplugin_settings' );

			// Output the hidden fields, nonce, etc.
			settings_fields( 'myplugin_settings_group' );

			// Submit button.
			submit_button();

			?>
		</form>
	</div>

	<?php
}

?>

This function creates a form, inside of which we call several functions. As you can see, the form will POST its data to the options.php page. This is important, because unless you set the action to point to options.php, your data wont automatically be saved. Don’t worry though, this doesn’t mean that you have to use the API only on admin screens registered as sub-menus of the options page; after the data is saved the user will be redirected back to wherever they started. And if you are using the Settings API on an admin screen that isn’t a child of the options admin screen, you’ll want to add a call to settings_errors() to the top of your screen, to display any errors (and, unintuitively, the success message when all goes well).

Within the form, we first call do_settings_sections(), which displays the settings sections which I’ll show you the code for in a moment (see image below). Then we call settings_fields(), which adds some hidden fields (called an options group) to go along with our sections (we’ll talk about this more a little later, too). Then we add a submit button, with the aptly named submit_button() function.

settings-api-2

Option Groups

An option group is just a group of options. When you create a new settings field (see below), you have to add it to an options group. That field will be ignored, unless it is submitted as part of that group. The option group is defined by some hidden fields in the form, which look something like this:

<input type="hidden" value="myplugin_settings_group" name="option_page"></input>
<input type="hidden" value="update" name="action"></input>
<input id="_wpnonce" type="hidden" value="ec6732adff" name="_wpnonce"></input>
<input type="hidden" value="/wp-admin/options-general.php?page=myplugin_settings" name="_wp_http_referer"></input>

The hidden fields for a particular group are added to a form using the settings_fields() function. The parameter for this function is the group’s name.

settings_fields( 'myplugin_settings_group' );

When an option is updated, WordPress checks to make sure that it was submitted along with the group it is registered with.

Creating Sections

A section, as you can see in the images, is a group of input fields under a heading and some text.

If you are creating your own settings page, then you will need to add sections to it. (If you are just adding some options to a preexisting page, then you may just want to add your fields (see below) to a section that already exists on that page.)

The setting sections registered with a page are displayed by calling the do_settings_sections() function. All of the setting sections registered with that page will be displayed.

do_settings_sections( 'myplugin_settings' );

The add_settings_section() function is the one used to add a settings section to a page. It takes four parameters:

  1. The sections slug.
  2. The section’s title.
  3. The name of the function that will display the section’s content.
  4. The page to display the section on.

The code might look something like this:

add_settings_section(
	/*1*/	'myplugin_settings_section_1',
	/*2*/	'Section 1',
	/*3*/	'myplugin_settings_section_1_callback',
	/*4*/	'myplugin_settings'
);

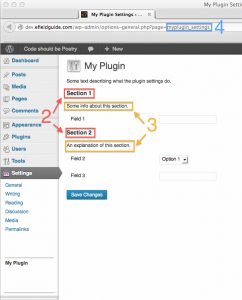
The result of that on the page is illustrated below (the second section was added in the same way).

settings-api-3

The callback function (parameter 3) is fired right below the section heading. You can use that to add an explanation of what the section’s settings do, etc.

function myplugin_settings_section_1_callback() {

	echo( 'Some info about this section.' );
}

Adding Fields

A settings field is just a form field. It gets assigned to a particular section on a particular page, and registered with a particular group. The add_settings_field() function is the one that adds a settings field to a particular section and page. It takes five parameters:

  1. The field’s slug.
  2. The text of the field’s form label.
  3. The name of the function to use to generate the form field.
  4. The page to display the field on.
  5. The section to display the field under.

The code would look something like this:

add_settings_field(
	/*1*/	'myplugin_field_1',
	/*2*/	'Field 1',
	/*3*/	'myplugin_field_1_input',
	/*4*/	'myplugin_settings',
	/*5*/	'myplugin_settings_section_1'
);

We also need to create an option in the database to hold the default value of this settings field. It will automatically be updated by WordPress when the setting is updated. That’s the great thing about the Settings API!) You can do that with add_option():

add_option( 'myplugin_field_1', 'the default value for this field' );

As you can see, the first parameter is the field’s slug, the second is the value you want it to have.

We also need our function to display the field (parameter 3 of add_settings_field()). It would look like this:

function myplugin_field_1_input() {
	
	echo( '<input type="text" name="myplugin_field_1" id="myplugin_field_1" value="'. get_option( 'myplugini_field_1' ) .'" />' );
}

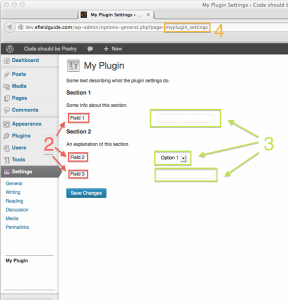
In this case we are creating a text input. The name and id attributes need to match the setting field’s slug. We assign the current value of that option to the value attribute, so we know what the current setting is.

If we added two more fields, our page might look something like this:

settings-api-4

But we still need to register our new field with a settings group, or else WordPress won’t recognize it when the settings are updated. The function to do that is register_setting():

register_setting( 'myplugin_settings_group', 'myplugin_field_1' );

As you can see, it takes only two parameters:

  1. The name of the group we want to register the field with.
  2. The name of the field.

Putting it all together

When we put all the code together, and add in the code for the other section and two more fields, it will look something like the code shown below.

<?php

/** Set Defaults **/
add_option( 'myplugin_field_1', 'some default value' );
add_option( 'myplugin_field_2', '1' );
add_option( 'myplugin_field_3', 'another default value' );

/** Add Settings Page **/
function myplugin_settings_menu() {

	add_options_page(
	/*1*/	'My Plugin Settings',
	/*2*/	'My Plugin',
	/*3*/	'manage_options',
	/*4*/	'myplugin_settings',
	/*5*/	'myplugin_settings_page'
	);

}
add_action( 'admin_menu', 'myplugin_settings_menu' );

<?php

/** Settings Page Content **/
function myplugin_settings_page() {

	?>

	<div class="wrap">
		<?php 
		
		// Uncomment if this screen isn't added with add_options_page() 
		// settings_errors(); 
		
		?>

		<h2>My Plugin</h2>
		<p>Some text describing what the plugin settings do.</p>

		<form method="post" action="options.php">
			<?php

			// Output the settings sections.
			do_settings_sections( 'myplugin_settings' );

			// Output the hidden fields, nonce, etc.
			settings_fields( 'myplugin_settings_group' );

			// Submit button.
			submit_button();

			?>
		</form>
	</div>

	<?php
}

/** Settings Initialization **/
function myplugin_settings_init() {

     /** Setting section 1. **/
	add_settings_section(
	/*1*/	'myplugin_settings_section_1',
	/*2*/	'Section 1',
	/*3*/	'myplugin_settings_section_1_callback',
	/*4*/	'myplugin_settings'
	);
	
	// Field 1.
	add_settings_field(
	/*1*/	'myplugin_field_1',
	/*2*/	'Field 1',
	/*3*/	'myplugin_field_1_input',
	/*4*/	'myplugin_settings',
	/*5*/	'myplugin_settings_section_1'
	);

	// Register this field with our settings group.
	register_setting( 'myplugin_settings_group', 'myplugin_field_1' );
	
   /** Section 2 **/
	add_settings_section(
	/*1*/	'myplugin_settings_section_2',
	/*2*/	'Section 2',
	/*3*/	'myplugin_settings_section_2_callback',
	/*4*/	'myplugin_settings'
	);
	
	// Field 2.
	add_settings_field(
	/*1*/	'myplugin_field_2',
	/*2*/	'Field 2',
	/*3*/	'myplugin_field_2_input',
	/*4*/	'myplugin_settings',
	/*5*/	'myplugin_settings_section_2'
	);

	// Register this field with our settings group.
	register_setting( 'myplugin_settings_group', 'myplugin_field_2' );	
	
	// Field 3.
	add_settings_field(
	/*1*/	'myplugin_field_3',
	/*2*/	'Field 3',
	/*3*/	'myplugin_field_3_input',
	/*4*/	'myplugin_settings',
	/*5*/	'myplugin_settings_section_2'
	);

	// Register this field with our settings group.
	register_setting( 'myplugin_settings_group', 'myplugin_field_3' );
}
add_action( 'admin_init', 'myplugin_settings_init' );

function myplugin_settings_section_1_callback() {

	echo( 'Some info about this section.' );
}

function myplugin_settings_section_2_callback() {

	echo( 'An explanation of this section.' );
}

/** Field 1 Input **/
function myplugin_field_1_input() {

	echo( '<input type="text" name="myplugin_field_1" id="myplugin_field_1" value="'. get_option( 'myplugini_field_1' ) .'" />' );
}

/** Field 2 Input **/
function myplugin_field_2_input() {

	// This example input will be a dropdown.
	// Available options.
	$options = array(
		'1' => 'Option 1',
		'2' => 'Option 2',
		'3' => 'Option 3',
	);
	
	// Current setting.
	$current = get_option( 'myplugin_field_2' );
	
	// Build <select> element.
	$html = '<select id="myplugin_field_2" name="myplugin_field_2">';

	foreach ( $options as $value => $text )
	{
		$html .= '<option value="'. $value .'"';

		// We make sure the current options selected.
		if ( $value == $current ) $html .= ' selected="selected"';

		$html .= '>'. $text .'</option>';
	}
	
	$html .= '</select>';

	echo( $html );	
}

/** Field 3 Input **/
function myplugin_field_3_input() {

	// Output the form input, with the current setting as the value.
	echo( '<input type="text" name="myplugin_field_3" id="myplugin_field_3" value="'. get_option( 'myplugin_field_3' ) .'" />' );	
}

?>

This is the code used to generate the example page shown in the images. Feel free to copy it, and modify it to fit your needs.

I hope you have found this tutorial helpful. If you have any comments, please leave them below.

CubePoints Modules

Since writing this, development of the CubePoints plugin has slowed to a halt. So I’ve created my own points plugin, WordPoints. It also supports modules. Please give it a try!


The CubePoints plugin has some very nice features, and one of those is its modules. CubePoints modules allow you to extend the functionality of the CubePoints plugin. In this tutorial, we’ll take a look at some of the things that you can do with your own CubePoints modules.

What can a CubePoints Module do?

A CubePoints module can do anything that a WordPress plugin can do. The only difference is that is treated like it’s part of CubePoints, not a separate plugin. The main advantage of creating a custom CubePoints module as opposed to writing your own plugin, is that it keeps everything nice and organized. You are just extending the CubePoints plugin, not creating something completely new, so it is more intuitive to write a CubePoints module than to write a separate plugin. Having said that, the two are in most respects identical, so you could really do either.

Registering the Module

When you create your own module, the first thing that it needs to do is register itself with CubePoints. If you don’t, then the module won’t show up on the CubePoints->Modules page. This is done using the cp_module_register() function. This function takes 8 different parameters. It might look something like this:

cp_module_register(
	'My Module',
	'my_module',
	'1.0',
	'Me',
	'http://example.com/me/',
	'http://example.com/my-module/',
	'This is my own module that does my really cool stuff!',
	1
);

Now lets take a look at what each of these parameters is:

  1. The module’s name.
  2. The module’s slug.
  3. The version.
  4. The modules author.
  5. The module author’s URL
  6. The module’s URL
  7. The module’s description.
  8. Can the module be deactivated? (1 = yes, 0 = no)

That’s pretty simple, no? There’s just a couple things to remember. Notice that last parameter. CubePoints looks at this to see whether the module can be deactivated. If its value is 1, then the module can be activated and deactivated via the CubePoints->Modules page. But if you set it to 0, then the module will be activated automatically as soon as it’s installed, and if you try to deactivate it from the CubePoints->Modules page you will get the message: “This module cannot be deactivated through this page. To deactivate this module, remove it manually.”

Performing actions on Module Activation

Maybe you have some things that you want your module to do when it gets activated. Stuff it only needs to do once. Well, for that we do something like this:

function cp_module_my_module_install() {

	// Do stuff here
}
add_action( 'cp_module_my_module_activate', 'cp_module_my_module_install' );

We create a function to do whatever we need to do, and then hook it to the 'cp_module_*_activate' action hook. (Replace the * with your module’s slug). Now the function cp_module_my_module_install() will be run whenever the module is activated. It will also run if you change the module’s version (it will be run when the version changes, whether you increase or decrease it). Beware, that it will not run if your module can’t be deactivated. I guess since the module can’t be deactivated, it really can’t be activated either!

Module Content

Before we talk about what you can do with module, I need to note that the contents of your CubePoints module (except for the registration and activation functions) need to be wrapped in an if statement that checks that the module is actually active:

if ( cp_module_activated( 'my_module_slug' ) ) {

	// The module is activated! Do stuff here.
}

The cp_module_activated() function will check whether the module with that slug is active. If it is, then your module’s functions will get run. If it isn’t, we don’t want to run its functions!

The CubePoints functions

Here is an explanation of all of the most useful functions in CubePoints. These are the ones you are probably going to want to use in your custom module!

cp_currentUser()

You can use this function to get the ID of the current user. It doesn’t take any parameters, so can be called like this:

$current_user = cp_currentUser();
// $current_user now contains the current user's ID!

cp_getPoints()

This function is used to get the number of points a user has. It has only one parameter: a user’s ID. You might use it like this:

// Get the number of points for the user whose ID is 3.
$points = cp_getPoints( 3 );

cp_updatePoints()

You can use this function to update the number of points a particular user has. It takes two parameters: the user’s ID, and the number of points you want the user to have.

// Set user 3's 250 points.
cp_updatePoints( 3, 250 );

cp_alterPoints()

Use this function to alter the number of points a user has. The last function just set the users points to a certain amount, but this function will add (or subtract) a certain number of points from a user.

// Give user 3 ten points.
cp_alterPoints( '3', '10' );

// Subtract ten from user 3's points.
cp_alterPoints( '3', '-10' );

cp_formatPoints()

This function formats the points value with the prefix and suffix. (These are set on the plugin’s settings page.)

$formatted_points = cp_formatPoints( '150' );
// $formatted_points will now look something like '$150points'.

cp_displayPoints()

This function may be used to display the points of a given user. It takes three parameters:

  1. The ID of the user you want to get points for (or you can set this to 0 to display the points of the current user).
  2. Whether to return the points as a string or echo() them immediately (echo()‘s by default).
  3. Whether to format the points with the prefix and suffix (set to true by default).

Examples:

// We can call the function without passing any parameters.
cp_displayPoints();

// The points of the current user will be formatted with prefix and suffix and echo'ed to the browser.

// Or we can set some or all of the parameters.
$points = cp_displayPoints( 3, true, false );

// $points now contains the unformatted number of points for user 3.

cp_getAllPoints()

This function returns an array of information about each user. It takes up to three parameters:

  1. The upper limit to the number of users in the array. (Default: no limit)
  2. An array of user_login names to exclude.
  3. The lower limit to the number of users. (Default: 0)

cp_points()

This function alters the users points, and logs the transaction. It takes 4 parameters:

  1. The transaction type.
  2. The userID of the user who the transaction is affecting.
  3. The number of points to add to (or subtract from) the user’s points.
  4. The log data.

The log data is filtered into a transaction description, based on the transaction type.

// Give user 3 100 points.
cp_points( 'custom', 3, 100, 'Congratulations! You won 100 points!' );
	
// Take 100 points away from user 3.
cp_points( 'custom', 3, -100, 'Thank you for donating!' );

cp_points_set()

This function is the same as the last one, except rather than adding (or subtracting) a given number of points, it resets the user’s points to a given amount.

// Set user 3's points to 250
cp_points_set( 'custom', 3, 250, 'Now you have 250 points!' );

cp_getPostCount()

Get the the number of posts made by a user with a given ID.

// How may posts as user 3 created?
$posts = cp_getPostCount( 3 );

cp_getCommentCount()

Get the number of comments made by a given user.

// How many comments has user 3 created?
$comments = cp_getCommentCount( 3 );

Action hooks

Now lets look at some of the action hooks included with CubePoints, and how to use them.

cp_logs_desciption

You can use this to create your own transaction type, and filter for the log data.

function cp_my_logs_desc( $type, $uid, $points, $data ) {

	if ( $type != 'my_type' )
		return;

	// Filter the log data here.
}
add_action( 'cp_logs_description', 'cp_my_logs_desc', 10, 4 );

This allows you to pass a small piece of data to the when you log a transaction, and then use that data to create a transaction description when the logs are displayed. For example, maybe you want to give user’s points for uploading an image, and want to display the image they uploaded with the logs. You could create a transaction type called 'image_upload'. Then you could just pass the URL of the image as the description data. You could assemble your description, using the ‘cp_logs_description’ filter, something like this:

function cp_image_upload_desc( $type, $uid, $points, $data ) {

	// If it's not an image upload transaction, then we bail out.
	if ( $type != 'image_upload' )
		return;
	
	// Our description would look like 'Image Upload: (image here)'.
	echo( 'Image Upload: <img src="'. $data .'" max-width="20px" max-height="20px" />' );
}
add_action( 'cp_logs_description', 'cp_image_upload_desc', 10, 4 );

Of course, there’s many other things that you could do. This is just an example.

One of the good things about doing it this way, is that you can change exactly how you want your descriptions to look. Just edit your function. If you passed the whole description as the data, there would be no easy way to change it later!

cp_config_form & cp_config_process

You can use these to action hooks in your module to add your own options to the CubePoints->Configure page. cp_config_form lets you add your own inputs to the form, while cp_config_process lets you process the values submitted by the form. An example of their use is below. Basically what this does is let you update the values of any custom transaction types that you create, from the CubePoints->Configure page.

<?php

// Register the module
cp_module_register( __( 'My Module', 'cp' ) , 'my_module' , '1.0', 'Me', 'http://www.example.com', 'http://example.com/' , __( 'My own module!!', 'cp' ), 1 );

// On installation, we set the default values for our custom points transactions.
function cp_my_module_install() {

	add_option( 'cp_my_module_value1', 10 );
	add_option( 'cp_my_module_value2', 25 );
}
add_action( 'cp_module_my_module_activate', 'cp_my_module_install' );

// If the module is active.
if ( cp_module_activated( 'my_module' ) ) {

	// Add a function to display the form inputs.
	function cp_my_module_config() {

		?>

		<br />
		<h3>My Module Config Options</h3>
		<table class="form-table">
			<tr valign="top">
				<th scope="row">
					<label for="cp_my_module_value1">My Value 1:</label>
				</th>
				<td valign="middle">
					<input type="text" id="cp_my_module_value1" name="cp_my_module_value1" value="<?php echo( get_option( 'cp_my_module_value1' ) ); ?>" size="30" />
				</td>
			</tr>
			<tr valign="top">
				<th scope="row">
					<label for="cp_my_module_value2">My Value 2:</label>
				</th>
				<td valign="middle">
					<input type="text" id="cp_my_module_value1" name="cp_my_module_value1" value="<?php echo( get_option( 'cp_my_module_value1' ) ); ?>" size="30" />
				</td>
			</tr>
		</table>

	<?php

	}
	add_action( 'cp_config_form', 'cp_my_module_config' );

	// Create a function to process the form inputs when the form is submitted.
	function cp_my_module_config_process() {

		// We update the options with the submitted values. We cast them as integers.
		update_option( 'cp_my_module_value1', (int) $_POST['cp_my_module_value1'] );
		update_option( 'cp_my_module_value2', (int) $_POST['cp_my_module_value2'] );
	}
	add_action( 'cp_config_process', 'cp_my_module_config_process' );
}

It shouldn’t be too hard to follow that, but I’ll break it down for you anyway:

  • We register the module.
  • We set the default values for our custom transaction types.
  • The rest of the code is only performed when the plugin is active.
  • The first function creates a form table on the CubePoints->Configure page. The id and name attributes of the input tags must match the name of your option. Also, we echo() the current value as the value for the input. The labels could be whatever you want.
  • We create a function to save the values of the out options when the form is submitted.

All that you need to do know is hook your options to a particular action. For example, when a user makes a comment, submits a form, visits a page, or performs any action. Exactly how that happens will depend on what action you are trying to award/subtract points for.

Hooking into other plugins

Okay, now you know how all of the CubePoints functions work. The question is, how are you going to use them? Chances are, you want to award points for some actions user’s perform, that is enabled by another plugin (maybe a custom one you wrote for yourself). So how do you do that?

This is actually the difficult part. There isn’t just one answer; the answer will vary based on the particular situation. But as a general rule, you are probably going to need to hook into an action that the plugin performs; i.e. create a function and call it through some action hook. If that’s “Greek to you”, then keep reading, but realize you may be in above your head.

Here I am going to give a simple example, based on a module by Tosh Hatch, in which he integrated CubePoints with bbPress. The module lets you set the number of points to give user’s when the create a forum topic and when the reply to a topic. A portion of it is shown below.

<?php

// Create a function to call when a user makes a new bbPress topic.
function bbpress_cb_new_topic() {

	// We include the $current_user global.
	global $current_user;

	// We give the current user the number of points set by the custom option cp_bbpress_topic.
	cp_points( 'bbpress_cb_new_topic', $current_user->ID, get_option( 'cp_bbpress_topic' ), '' );
}

/* 
 * This is the really good part. We hook our new function to the bbp_new_topic
 * action, found in bbp-includes/bbp-topic-functions.php. Now each time a user 
 * creates a new topic, they are awarded the number of points that we have set with
 * the cp_bbpress_topic option.
 */
add_action( 'bbp_new_topic', 'bbpress_cb_new_topic' );


// Then we create a function to display the transaction description.
function bbpress_cb_new_topic_log( $type, $uid, $points, $data ) {

	if ( $type != 'bbpress_cb_new_topic' )
		return;
		
	echo 'New Forum Topic';
}
add_action('cp_logs_description','bbpress_cb_new_topic_log', 10, 4);


/*
 * We do the same thing for when a user created a reply. We hook into the
 * bbp_new_reply action found in bbp-includes/bbp-reply-functions.php
 */
function bbpress_cb_new_reply() {

	global $current_user;
	cp_points( 'bbpress_cb_new_reply', $current_user->ID, get_option( 'cp_bbpress_reply' ), '' );
}
add_action( 'bbp_new_reply', 'bbpress_cb_new_reply' );

// And we add a function for the logs descriptions.
function bbpress_cb_new_reply_log( $type, $uid, $points, $data ) {

	if( $type != 'bbpress_cb_new_reply' )
		return;
		
	echo 'New Forum Reply';
}
add_action( 'cp_logs_description','bbpress_cb_new_reply_log', 10, 4 );

Basically, if you want to give a user points for performing an action, you need to find an action hook that’s fired when the user does that, and then create a function like the ones shown above to hook into it. That means you are going to have to look through some code, and find the actions you want to hook into. If none exist where you need one, you might even have to add your own (which is pretty simple to do). Of course, if you created the plugin in the first place, then adding an action hook here and there should be no problem for you.

Conclusion

For those that know how, CubePoints modules are a powerful tool. Up to now, though, there has been very little documentation of how to build them. I hope that you have found this tutorial helpful, and if you have any questions, comments, or suggestions, please leave a comment below. I’d love to hear what you have to say!